BRCK How To: Registration

Welcome to a new series of videos called BRCK: How To’s!

We’re kicking things off with a step-by-step walkthrough of the first thing you’ll want to do when you get your BRCK: register it. Learn everything from what the lights mean to how to handle some commonly encountered issues. Enjoy, and see below for a description of the registration process!

BRCK How To: Registration from BRCK on Vimeo.

Registration process:

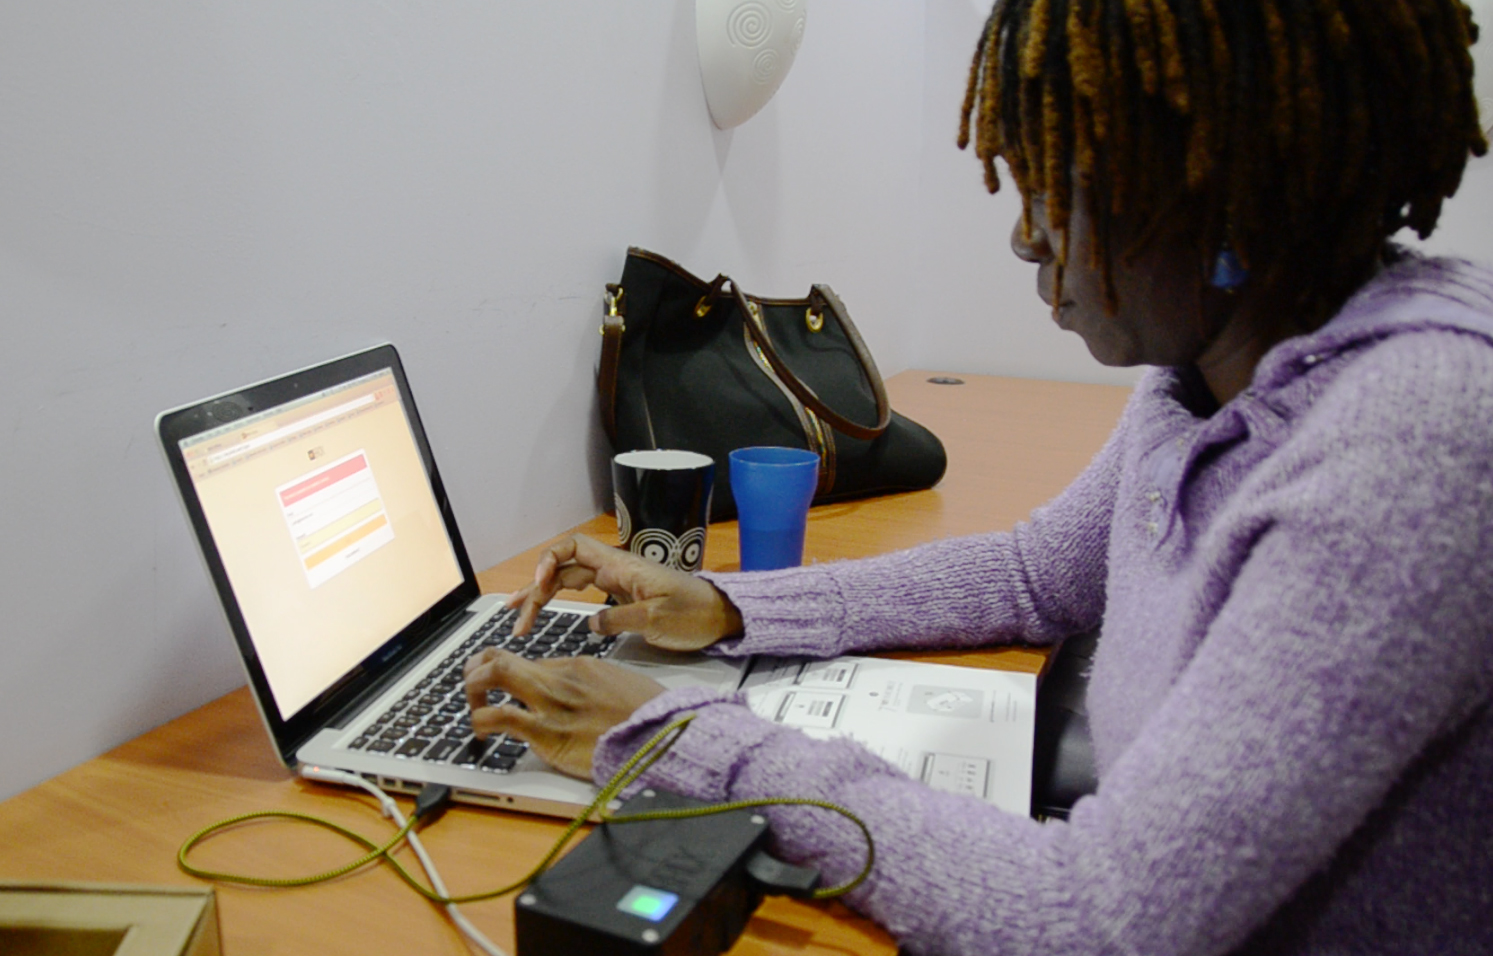
To setup your BRCK for the first time, plug it in and turn it on. The lights will tell you what it is doing.

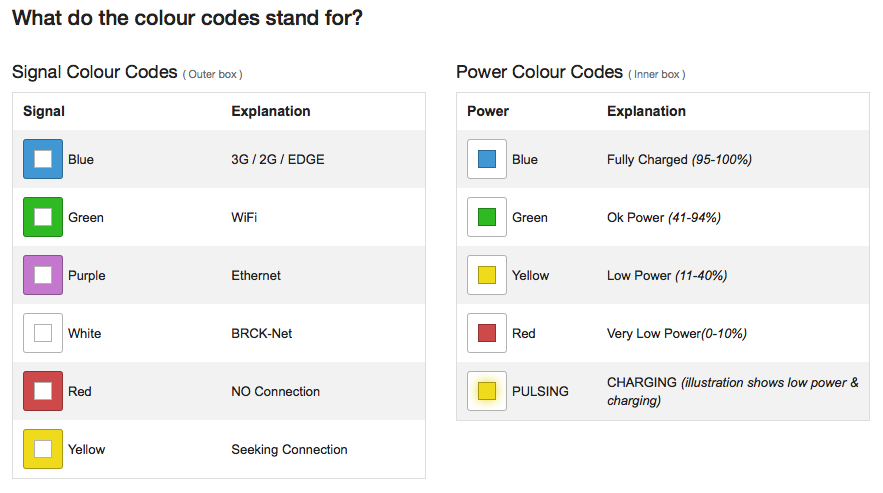
The center light tells you your power status:

  • Red < 10%.
  • Yellow < 40%.
  • Green < 95%.
  • Blue < 100%.
  • Pulsing indicates that your BRCK is charging.

The outer lights indicate your connection status:

  • Spinning means the BRCK is searching for a connection.
  • Solid outer lights mean your BRCK has established a connection. The outer ring will pulse at a rate that indicates your connection speed.
  • Orange is for the BRCK’s internal startup process.
  • Purple is for Ethernet connections.
  • Green is for WiFi bridging.
  • Blue is for 3G.

Visit my.brck.com/help for a helpful guide to the color scheme.

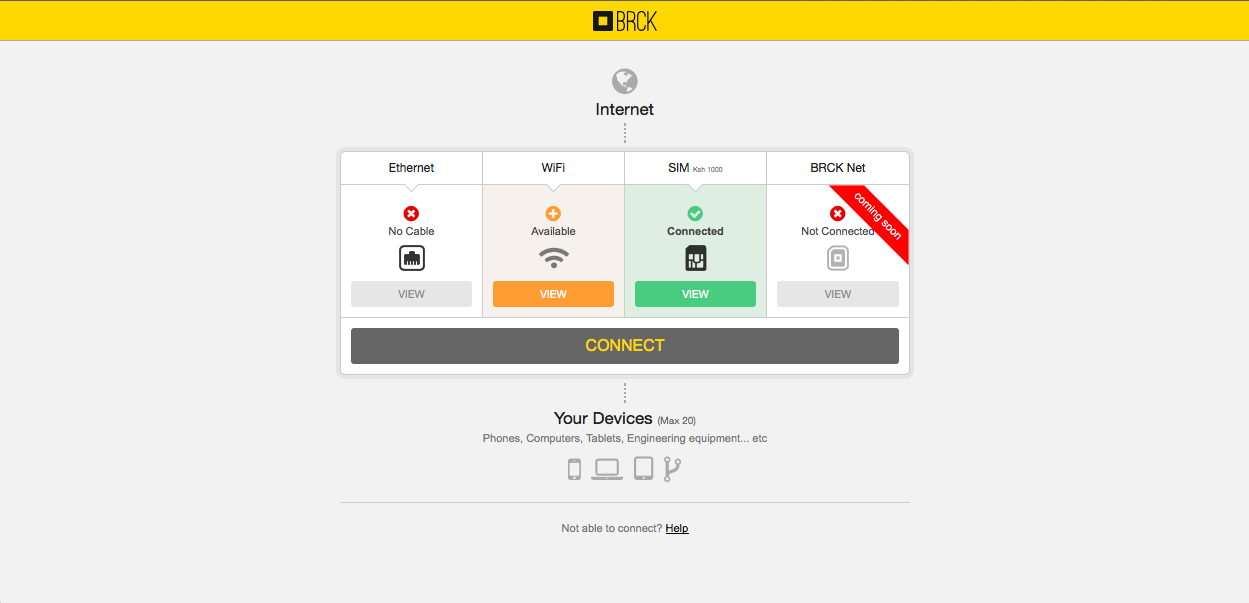
To register your BRCK, it needs to be connected to the Internet. After you turn it on, do one of the following:

  • Plug in an Ethernet cable from another modem or router.
  • Insert a data enabled SIM card.
  • Or use the local dashboard to configure a WiFi bridge (more on this below).

Go to your WiFi list and look for your BRCK. It will appear as “BRCK_somelongstringofnumbers”.

Connect to it, open your browser and go to my.brck.com.

If you have an Ethernet or SIM connection, you will be taken to the registration page and can skip the next step.

If you do NOT have an Ethernet or SIM connection, you will be redirected to the local dashboard where you can configure a WiFi bridge:

  • Click “View” under WiFi.
  • Select your network.
  • Enter your password.
  • Click join.
  • Wait patiently while your BRCK configures these changes (this can take several minutes).

Once you are directed to the registration page, click “Sign up”.

  • Enter your name, email, and choose a password.
  • Click “Create account”.
  • Once your BRCK has finished applying these changes, click “Go to your dashboard”.

You will be taken to the cloud dashboard for your BRCK, where you can see statistics regarding your power status, data usage, and devices connected to your BRCK.

Click on “Preferences” in the left pane to change your connection configuration.

  • To change the name of the WiFi network your BRCK broadcasts, click in the box under “WiFi Name”.
  • Enter a new name, set a password, and click “Save”.
  • You may see an error message at this point. This happens because once you’ve changed the name of your BRCK’s WiFi network, your computer will lose connection to it and the cloud dashboard.

To reconnect to your BRCK’s new WiFi network:

  • Open your WiFi list.
  • Your BRCK’s new WiFi name should appear shortly.
  • Connect to it, et voila!

Congratulations, your BRCK is now registered! You can access the Internet, the cloud dashboard, and configure your BRCK from anywhere in the world.

Of Trees and Forests – Improving the BRCK User Experience

You’ve heard the expression about missing the forest for the trees.  It happens to the best of us.  It even happens to tiny little hardware startups in Kenya.  We have been so focused on the details of getting our product to market that we weren’t able to put the BRCK – new in the box – into the hands of real users and get their feedback on registering and configuring the BRCK.  In all fairness, we only received our first shipment of production BRICKs in Nairobi on Friday – we have been doing all of our development and testing with about 12 overworked, under-appreciated, pre-production units.  I’m not trying to make an excuse for us missing one of our core competencies.  Just praying for a little understanding as we work through the user experience (UX) of interacting with a BRCK.

The initial user reports started trickling in over the last week and half as we have been ramping up our shipping volumes.  Initially the feedback was very positive with comments on the packaging, the quality of the BRCK, even the colors of the charging cable.  However, there were also those occasional but niggling little comments on some frustrations with getting the BRCK setup.  We did get some pretty brutal feedback from our internal family at Ushahidi – who received the initial BRCKs from the production line – but we did somewhat discount their experiences based upon small fixes and patches that we had subsequently pushed into the production process.

We then started receiving some more concerning reports from real customers as our support systems started getting put into service.  Questions about what the lights meant, whether the BRCK was powered on, how to properly insert SIMs/chargers, etc.  Some of the questions were understandable.  Others, however, seemed peculiar given how easy the BRCK is to setup – or so we thought.  You see, most of us have set the BRCK up hundreds of times – personally I’m inching towards 1,000 setups.  We start it up, watch the sequence of lights, allow the BRCK to navigate us to the registration page, enter our information, and wait patiently for the new settings to be applied and the Internet to begin streaming through our browsers.  We test with Ethernet cables, SIM cards, and even WiFi-bridging to our office routers.  Sure we run into issues, but these issues get logged in our bug tracking system, assigned to a resource, fixed, deployed, and retested.  We are professionals; we know how to make robust technology – or so we thought.

We quickly noticed that some of the early adopters had bad experiences setting up their BRCKs, and with a foreboding ounce of humility that we decided we needed to throw a few more factory-fresh BRCKs in front of some of the great tech folks that hang around in Nairobi and record their experiences and observations with unboxing and setting up a BRCK.  We started by heading down one floor to the amazing ladies who run Akirachix.

Judy from Akirachix setting up a BRCK

Judy from Akirachix setting up a BRCK

They’re super smart, super tech-savvy, and passionate about technology from Kenya – especially BRCK.  It was just a little embarrassing when they struggled with even getting the BRCK powered on.  We then brought in one of our key local business partners, Upande, who have been chomping at the bit to get their hands on BRCKs to begin integrating a bunch of sensors and gadgets.  We sat their principal down in our conference room with a running video camera, brought in the entire BRCK team to watch him, and then furiously started scribbling on notepads.  It wasn’t pretty.

Mark from Upande setting up his BRCK

Mark from Upande setting up his BRCK

Things that are completely obvious to us were completely unobvious to the user.  The user guide – while well designed – failed to communicate a handful of really key pieces of information that provide context to a user setting up their BRCK.  The amazing lights – which get lots of oohs and aahs – mean absolutely nothing without a clear explanation.  We quickly huddled the team, watched the tapes, reviewed the play-by-play notes, and grumbled as we saw the small but significant omissions in our user experience.  Nothing fatal.  Honestly, nothing that significant.  But, for us and our users, a perceptible distraction from the quality of the hard work that we have put into BRCK over the last 18 months.

Emmanuel and Jeff eworking the setup process

Emmanuel and Jeff reworking the setup process

Undeterred in our mission – or our pursuit of excellence – we devised some immediate changes to the registration process that should dramatically simplify the setup experience.  We also designed and had printed a color chart to explain the lights on the BRCK – we are including these in the box going forward and posting them in the mail to everyone who already has BRCKs.

Because the UX is so important we have placed the production and shipping on a brief pause while we sort through these handful of changes.  I know we won’t get everything resolved to your, or our, demanding standards but hopefully we can move the needle in the right direction.

Although these changes will have the biggest impact on customers who haven’t yet received their BRCKs, we did want to outline a few of the critical aspects of setting up a BRCK that have proven to be hurdles in the process for clients who already have their BRCKs:

1)   The Spinning Lights – in short, the outer LEDs are the connectivity indicator and the inner LED is the battery indicator.  The battery light will be on (and flashing) while charging but this does not mean the BRCK is powered on.  Here is a link to our forum post on the meaning of the various colors (http://forums.brck.com/t/a-guide-to-the-light/108/2).

1b9d8f1603301e08

2)   USB Charging Connection – the charging connection for the BRCK is under the same flap as the SIM slot – the farthest slot on the right.  What is tricky is that the cable must be oriented with the USB logo facing down.  This is opposite of many devices and can cause some confusion. The other end of the cable can be plugged into any USB charging source (e.g. laptop, wall charger, another BRCK).

3)   Local vs Cloud Dashboard – there are actually two dashboards that are part of the BRCK.  For most activities, the Cloud Dashboard is the go-to location but it does require connectivity to the Internet to access. You can access the Cloud Dashboard at http://my.brck.com.  The Local Dashboard is provided solely to assist with getting a connection.  You can access the Local Dashboard at http://local.brck.com (also at http://192.168.69.1).  When navigating to the Local Dashboard you may see a spinning BRCK logo that indicates the BRCK is transitioning to a mode where the Local Dashboard can be accessed.  Please be patient, it can sometimes take awhile for the BRCK to make this transition.

BRCK Cloud Dashboard

BRCK Cloud Dashboard

BRCK Local Dashboard

BRCK Local Dashboard

4) Source of Internet – in order for the BRCK to get registered you will need a working source of Internet.  The easiest way to achieve this is to connect an ethernet cable from your home router.  Another easy way is to insert a pin-unlocked 3G SIM with a data bundle.  If neither of these options are available, the BRCK will reroute you to the Local Dashboard where you can connect via WiFi-bridging or configure a locked SIM.

We’re continuing on user testing today and we have instituted some immediate changes to the registration and setup process that make the process clearer and more intuitive.  For those who have already received BRCKs, free free to get in touch with us at [email protected] and we’re happy to help you with any setup issues along the way.  We are also going to put out an unboxing and setup video this week.  We hope that seeing someone setup a BRCK will be a useful guide for getting your own BRCK registered and configured.

Finally, we know that many of you are eagerly awaiting receipt of your BRCKs.  We are finally make strides at getting our daily production volumes up and we expect to have the backlog cleared within the next 2 – 3 weeks.  We do apologize that this UX issue is going to delay shipping for a couple of days but we believe that it will be worth it if you are able to more fully enjoy your BRCK unboxing and setup experience.


An Nguruman Excursion

This weekend Reg, Philip and I took off for the Nguruman Escarpment, which is about a four hour drive outside of Nairobi. Our goal was to field test a BRCK with some friends of ours, Philip and Katy Leakey, who live in a tented camp at the top of the Ngurman escarpment, which is on the edge of the network.

Nairobi to Nguruman route, with elevation.  Some areas at 31% grades.

Nairobi to Nguruman route, with elevation. Some areas at 31% grades.

The town of Ngurumani sits at the base of the escarpment, and you rise 3,000 feet on a rough dirt road in order to get to their camp. The Leakeys use solar and generator power, and the only way they can get internet is using either spotty 3g dongles, or very expensive (and slow) VSAT services. It’s not ideal, and for a couple who run some amazing businesses with global reach, that grow wealth in their Masai community, it’s a real problem to not be connected to the internet consistently.

The Journey

Early Sunday morning, we set out. I had done this drive in a car before, but wanted to see if I could do it on the motorcycle too, so both Philip and I rode out on bikes while Reg followed in the Land Rover. It’s an incredibly scenic trip, as you go through the dry, Masai country, over the sodium flats of Lake Magadi with their pink and white ponds, and into the back country. The views from the escarpment are majestic, and the air is clean and crisp, unlike Nairobi.

Coming down a steep and rocky hill overlooking Lake Magadi

Coming down a steep and rocky hill overlooking Lake Magadi

Reg in the Land Rover at Lake Magadi

Reg in the Land Rover at Lake Magadi

Philip crossing a stream

Philip crossing a stream

The good news was that we did the ride with no meaningful problems.

The bad news was that I was unprepared for just how difficult the climb up to the top of the escarpment is. In a car it’s tough, but 4 wheels give you some balance, as well as much needed traction when you get to the really steep grades that have a lot of sand beneath you. As if courting disaster, I also had forgotten to change my tires on my motorcycle to knobbies until too late, so was stuck going up in city tires. Not a good idea. There’s a part of the road that gets to 31 percent grade, with S-curves and if you slow down, you’re in trouble.

I ended up stalling out on this one particularly steep portion, and was exhausted trying to keep it upright, and push the bike forward as it dug itself deeper into the sand and gravel. Finally, Reg caught up with me and was able to help push as I got it going again, and we were able to get to the top without any more issues. The way back down was just a controlled slide, as the brakes helped, but you couldn’t actually stop yourself from progressing downwards. One particular S-curve remains engraved in my memory, since that’s where a cobra dropped from a bush next to me. Fortunately it was small, and wanted to get away from me as much as I did from it, so we parted amicably.

The Field Test

We carried with us an assortment of large and small antennas, and we were particularly keen to try out the new ones from Poynting Antenna in South Africa. We also brought the normal BRCK, Sandstorm case and our Wilson antenna amp (booster). Beyond that, we carried our standard medical kit, tools, SIM cards and water.

Using a Yagi from Poynting Antenna

Using a Yagi from Poynting Antenna

The main antenna we used was the large, 1 meter-long, cast aluminium Yagi antenna by Poynting. It’s big, tough and not easy to pack around with you, but it gets the best gain. We were easily able to reach out and grab the signals from the mobile phone towers about 4-5 kilometers away, and we got 90% or 54dBi.

It turns out that you can get three mobile phone connections from the Leakey’s. Safaricom has a decent signal, but the tower that serves the people in that community has no internet connection, to that was a dud. Orange also has a tower, and supposedly the internet data connection does work on it, but it wasn’t a strong signal and we didn’t have any luck with it. Airtel, on the other hand, had a good signal and had a data connection.

Philip and Reg getting the BRCK working at the Leakey's camp

Philip and Reg getting the BRCK working at the Leakey’s camp

Lessons Learned

While we had strong signal, we had two issues that we needed to solve, and only an hour to do it before we had to head back down the hill to make it back to Nairobi before dark.

First, we mainly use Orange and Safaricom internally, and didn’t have an Airtel SIM card with us. Fortunately Katy had one, so we were able to use it. This was an oversight on our part, and we’ll stock a couple of these Airtel SIMs in the future.

Second, the Airtel SIM had no credit on it. Since all of us carry phones that hold micro- or nano-SIMs, we had no way of topping it up either. An easy solution is that we’ll carry a simple phone with us that we can do this with in the future, but we also want to explore how we can enable this same top-up activity using the local (non-cloud) dashboard of the BRCK.

Third, that not all towers work, some give bad information. Just because you get a signal does not mean that you are connected to the internet, even if it says “Edge” or “3G” on your phone.

All-in-all, it was a good excursion, a chance to eat our own dogfood outside the comfort of Nairobi and the iHub. It was a reminder to be more prepared (in both the journey and the field test), and also a great opportunity to see some less well-traveled parts of Kenya.

The BRCKs view of the valley

The BRCKs view of the valley